Share with your friends!
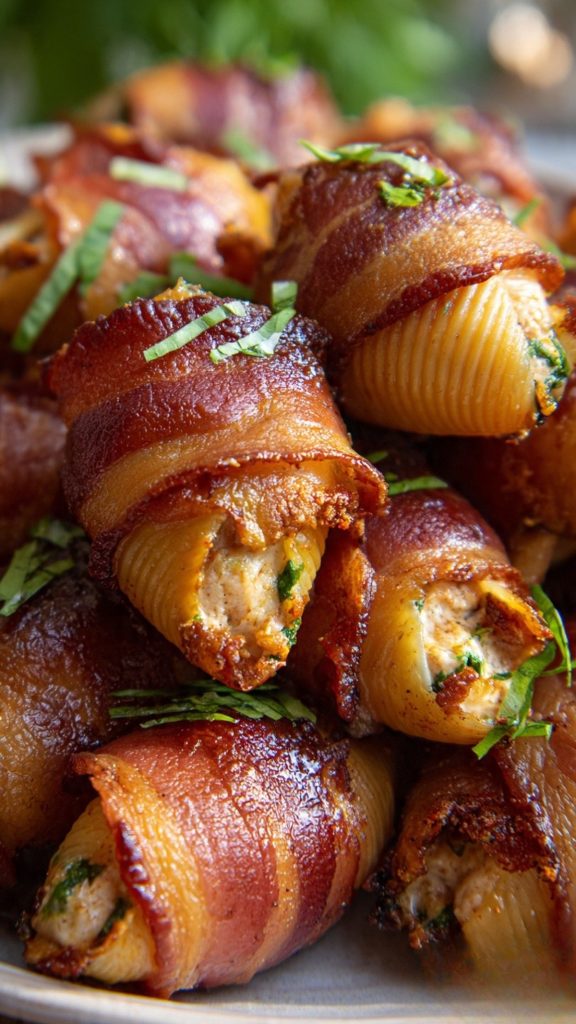
Bacon really runs the show in these Shotgun Shells Bacon, and that’s exactly why this recipe works so well. Instead of just being a topping, bacon becomes the crispy, smoky “shell” that holds everything together and keeps the manicotti from drying out. It bastes the pasta and meat filling as it cooks, so you end up with tender shells, juicy filling, and that salty, caramelized bacon on the outside.
I like this recipe because it’s high-impact without being fussy. You’re using affordable, straightforward ingredients—ground beef, hot Italian sausage, cream cheese, shredded cheese, and barbecue sauce—but the bacon takes them from basic to attention-grabbing. These are ideal when you want something that looks impressive on a platter but doesn’t require restaurant skills to pull off.
If you’ve never worked with manicotti shells this way, don’t worry. You don’t have to pre-boil them, and I’ll walk you through how to stuff and wrap them so they don’t crack or fall apart. The oven does most of the work at a low temperature, giving the bacon time to render and crisp while the filling cooks through safely.
Whether you’re feeding a crowd for game day or just want a fun, meaty appetizer that disappears fast, these Shotgun Shells Bacon are worth the time. Once you understand a few simple techniques—like packing the filling firmly and wrapping the bacon so it stays put—you’ll feel confident making them again and again.
Your New Favorite: Shotgun Shells Bacon
Click here to get printable version
What You’ll Need
- (2) 8-ounce boxes manicotti shells (about 28 shells)
- 1½ pounds ground beef
- 1 pound hot Italian sausage
- 1 medium onion, finely diced
- 2 cups shredded Colby Jack or cheddar cheese
- 6 ounces cream cheese, softened
- 1 jalapeño, finely diced (remove seeds for less heat)
- 2 teaspoons Slap Ya Mama seasoning (or other Cajun seasoning)
- 2 teaspoons garlic powder
- 2 teaspoons black pepper
- 1 teaspoon red pepper flakes (optional for extra heat)
- (3) 12-ounce packages bacon (you may not use every slice, but you’ll be close)
- ⅓ cup barbecue sauce, plus extra for brushing
How to Make It
- Prep your pan and oven. Preheat your oven to 300°F (150°C). Line a large baking sheet with aluminum foil for easy cleanup, then place a wire rack on top. This allows the bacon fat to drip away and helps the shells crisp up evenly. Set aside.
- Make the filling. In a large mixing bowl, add the ground beef, hot Italian sausage, diced onion, shredded cheese, cream cheese, jalapeño, Slap Ya Mama seasoning, garlic powder, black pepper, red pepper flakes, and ⅓ cup barbecue sauce. Use clean hands or a sturdy spoon to mix until everything is evenly combined. The mixture should be thick and stick together easily when pressed.
- Prepare the manicotti shells. Leave the manicotti shells uncooked. Cooking them first makes them fragile and hard to fill. Keep them dry and handle them gently to avoid cracking.
- Stuff the shells carefully. Take a small amount of filling and press it into one end of a manicotti shell using your fingers or the handle of a spoon. Flip and fill from the other end until the shell is packed full. Make sure there are no empty gaps or air pockets inside—this helps the pasta cook evenly and keeps the shape. Repeat with all shells.
- Wrap with bacon. Take 1–2 slices of bacon and wrap each stuffed manicotti shell in a spiral pattern, slightly overlapping each turn and making sure you cover both open ends so the filling doesn’t escape. If one slice doesn’t reach end to end, use a second slice to finish covering. Place each wrapped shell seam-side down on the wire rack.
- Brush with barbecue sauce. Using a pastry brush or spoon, lightly coat the tops and sides of each bacon-wrapped shell with barbecue sauce. Don’t drown them; a thin, even layer is enough to add flavor and help with browning.
- Bake low and slow. Place the tray in the preheated oven and bake for about 60 minutes. This first hour lets the pasta start to soften and the bacon begin to render without burning.
- Flip and sauce again. After 60 minutes, carefully flip each shell using tongs. Brush the new top side with more barbecue sauce. Return to the oven and continue baking for another 60–70 minutes, or until the bacon is deeply browned and crispy and the internal temperature of the filling reaches at least 165°F (74°C).
- Rest and serve. Remove the shotgun shells from the oven and let them rest on the rack for about 5–10 minutes. This helps the juices settle and makes them easier to handle. Slice into pieces or serve whole as hearty appetizers.
Stuffing Manicotti Cleanly
Working with uncooked manicotti can feel tricky at first, but a few habits make it much easier. First, don’t rush. If you try to cram too much filling in at once, the shells are more likely to crack. Instead, pinch off a small amount of meat mixture, push it gently into one end with your fingers or the handle of a spoon, then switch sides and repeat until it’s full. If you want an even cleaner method, you can spoon the filling into a large zip-top bag, snip off a corner, and use it like a piping bag. Just be sure the opening is wide enough so the meat and cheese mixture can move through without clogging. Always check each shell after stuffing and press the ends to make sure the filling is firmly packed with no visible gaps.
Wrapping Bacon So It Sticks
Good bacon wrapping is what keeps these shotgun shells intact. Start with regular-cut bacon, not thick cut—the thinner slices render and crisp more reliably in the oven and conform better to the manicotti. Begin at one end of the shell and anchor the first inch of bacon firmly, then wrap in a spiral with a slight overlap all the way to the other end, covering both openings so the filling is sealed in. Place the wrapped shell seam-side down on the wire rack so the weight of the bacon helps it stay in place. A light first brush of barbecue sauce also acts like glue as it cooks, helping the bacon adhere. If your bacon slices are short, don’t be afraid to use a second piece; it’s more important that there are no bare patches of pasta showing.
Grill and Smoker Variations
If you’d rather cook these outside, they adapt well to both the grill and the smoker with a few adjustments. For a smoker, aim for 250–275°F (120–135°C) and place the shells on a wire rack or directly on the grates. They’ll usually take about 2–2½ hours, depending on your smoker and how thick the bacon is. Look for fully rendered bacon and an internal temperature of at least 165°F. On a gas or charcoal grill, use a two-zone setup: one side hot, one side cooler. Keep the shells on the cooler side with the lid closed most of the time so they cook gently without flare-ups. Move them briefly over direct heat at the end if you want extra crisping, watching closely so the barbecue sauce doesn’t burn.
Curious About This Recipe? Read On
Do I need to boil the manicotti shells before stuffing them?
No, you should leave the manicotti shells completely uncooked for this recipe. The long, low bake time and the moisture from the meat, cheese, and bacon provide enough steam to soften the pasta as everything cooks together. If you pre-boil the shells, they become soft and fragile, which makes them tough to stuff and more likely to tear or collapse during wrapping. Using them dry also helps them hold their shape so the final shotgun shells slice neatly for serving.
Why is the oven temperature so low and the cook time so long?
The low temperature and extended cook time are there to handle a few jobs at once. First, you need the meat filling to cook through safely without drying out. Second, the bacon has to fully render its fat and become crispy, which takes time, especially when it’s wrapped in layers. Finally, the dry manicotti shells need gradual heat and moisture to soften all the way to the center. A higher temperature would brown the bacon too quickly while leaving the inside undercooked, so staying at 300°F is a safer, more forgiving approach for beginners.

Shotgun Shells Bacon
Equipment
- baking sheet
- Wire rack
- Large mixing bowl
Ingredients
- 2 8 ounce box uncooked manicotti shells
- 1.5 pound ground beef
- 1 pound hot Italian sausage
- 1 medium onion finely diced
- 2 cups Colby Jack cheddar cheese shredded
- 6 ounces cream cheese
- 1 jalapeño finely diced
- 2 teaspoons Slap Ya Mama seasoning
- 2 teaspoons garlic powder
- 2 teaspoons ground black pepper
- 1 teaspoon red pepper flakes
- 3 12 ounce package bacon
- 1/3 cup barbecue sauce plus extra for brushing
Instructions
- Preheat the oven to 300°F (150°C). Line a baking sheet with aluminum foil for easy cleanup and set a wire rack on top.
- In a large bowl, combine ground beef, hot Italian sausage, finely diced onion, shredded Colby Jack, cream cheese, diced jalapeño, Slap Ya Mama seasoning, garlic powder, black pepper and red pepper flakes. Mix until the filling is evenly blended.
- Carefully stuff each uncooked manicotti shell with the meat-and-cheese mixture from both openings, taking care to remove any air gaps so the filling is compact.
- Wrap each filled shell with bacon, covering the exposed ends; you may need to overlap two strips to fully encase a shell. Press gently so the bacon adheres to the filling.
- Brush both sides of the bacon-wrapped shells with additional barbecue sauce, then arrange them seam-side down on the prepared wire rack set over the baking sheet.
- Bake for 60 minutes, then carefully flip each shell, brush again with more barbecue sauce, and return to the oven.
- Continue baking for another 60–70 minutes, or until the bacon is deeply browned and crisp and the filling is cooked through.
- Remove the baking sheet from the oven and let the shells rest briefly before serving warm.