Share with your friends!
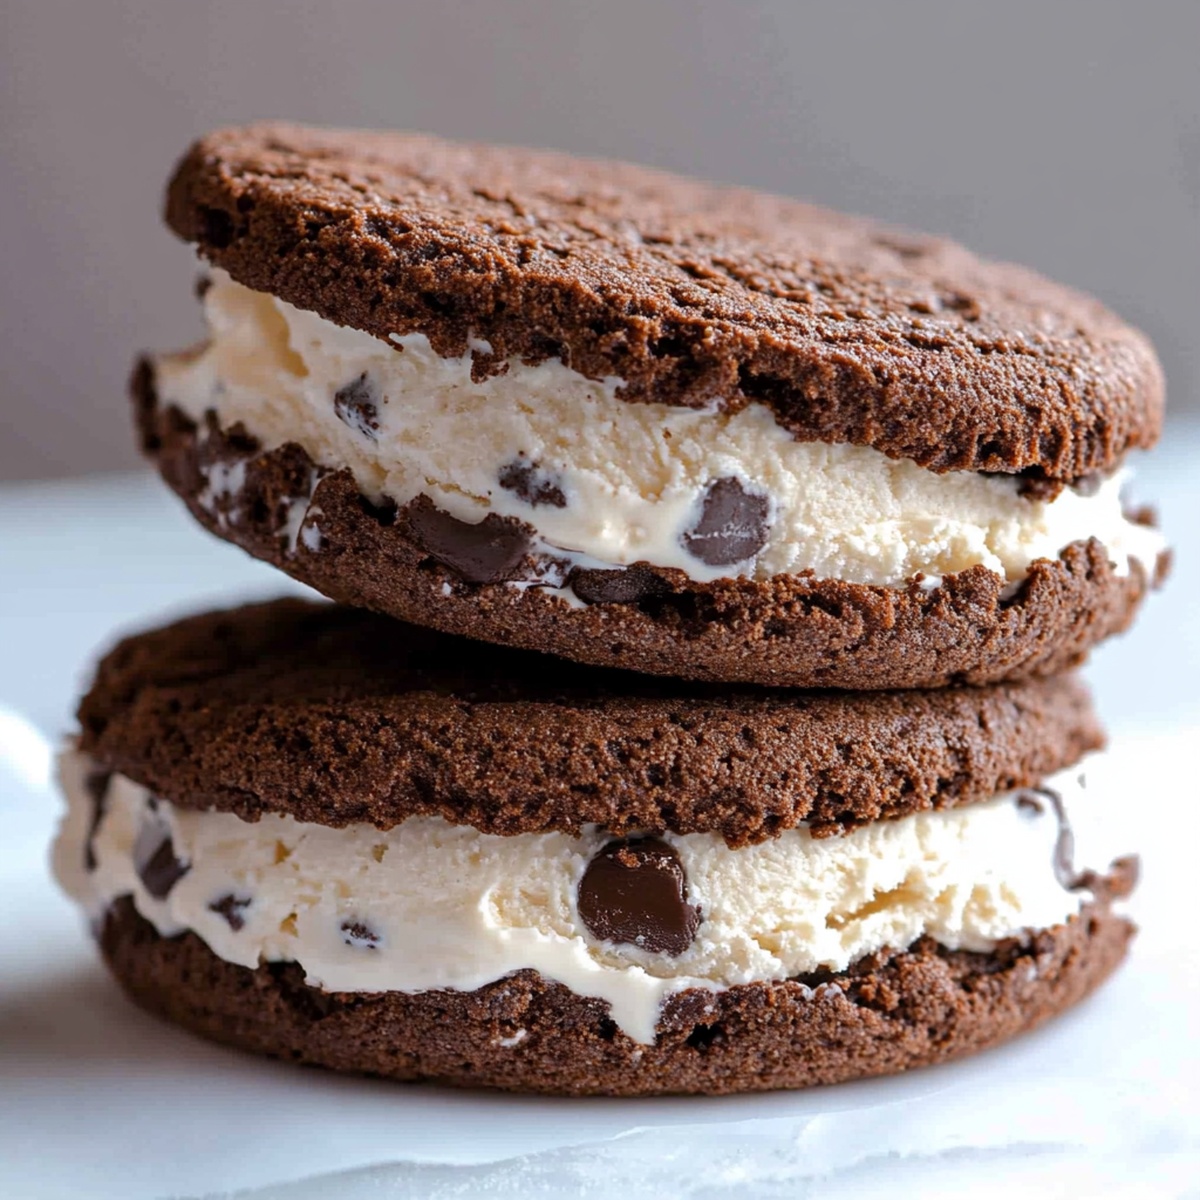
If you’ve ever tried to make ice cream sandwiches at home and ended up with rock-hard cookies that squeeze all the ice cream out the sides, you’re not alone. That’s exactly why I keep coming back to this Classic Chocolate Ice Cream Sandwich recipe. The cookies bake up thick, soft, and a little brownie-like, so they stay easy to bite even straight from the freezer.
This is my go-to when I want something that feels fun and a bit nostalgic without a lot of fuss. The cookie dough is made from pantry basics — butter, cocoa powder, sugar, and flour — and the ice cream is totally flexible. I like using mint chocolate chip for a fresh, travel-ice-cream-parlor kind of vibe, but any flavor you’ve fallen in love with on a trip will work here: pistachio from Italy, dulce de leche from Argentina, or black sesame from Japan if you can find it.
The real win is how practical this is for busy weeks. You bake the chocolate cookies once, fill them with store-bought ice cream, and suddenly you’ve got a stash of individual desserts in the freezer. They’re easy to grab after dinner, perfect for last-minute guests, and a solid solution when you want something special without turning on the oven every time.
If you’ve got 40–50 minutes and a bit of freezer space, these Classic Chocolate Ice Cream Sandwiches are worth adding to your rotation. The texture works, the steps are simple, and you can customize the flavor to match wherever your taste buds want to travel.
A Favorite to Share: Making Classic Chocolate Ice Cream Sandwich
Click here to get printable version
Gather These
- 8 tablespoons (115 grams) unsalted butter, at room temperature (1 stick)
- 1/2 cup (100 grams) granulated sugar
- 1/2 cup (100 grams) light brown sugar
- 1 large egg
- 1 teaspoon vanilla extract
- 1/4 teaspoon salt
- 1 1/4 cups (160 grams) all-purpose flour
- 6 tablespoons (30 grams) unsweetened cocoa powder
- 1/2 teaspoon baking soda
- 2 cups ice cream (any flavor you like)
Let’s Begin
- Heat your oven to 350°F (175°C). Line two baking sheets with parchment paper so the cookies release easily and don’t over-brown on the bottom.
- In a large bowl, add the softened butter, granulated sugar, and brown sugar. Using a hand mixer on medium speed, beat for 3 to 5 minutes until the mixture is light, creamy, and slightly fluffy. Don’t rush this step; proper creaming gives you thicker, softer cookies.
- Add the egg, vanilla extract, and salt to the bowl. Beat again on medium until everything is fully combined and the mixture looks smooth.
- In a separate bowl, whisk together the flour, cocoa powder, and baking soda until the color is even and there are no visible streaks of cocoa. This helps prevent clumps in the dough.
- Turn the mixer to low. Gradually add the dry mixture into the butter mixture, mixing just until no dry pockets remain. The dough will be very thick and a bit sticky. Stop mixing as soon as it’s uniform to keep the cookies tender.
- Using a rounded tablespoon or a medium cookie scoop, drop mounds of dough onto the prepared baking sheets, spacing them a couple of inches apart to allow for slight spreading.
- Bake for 9 to 12 minutes, until the cookies have puffed slightly and the tops look dry but still feel soft in the center when gently touched. They’ll continue to firm up as they cool, which keeps them chewy.
- Let the cookies cool on the baking sheets for about 5 minutes, then transfer them to a wire rack to cool completely. They need to be fully cooled before adding ice cream or the filling will melt.
- While the cookies cool, line a baking sheet or shallow pan with parchment paper or foil. Scoop your ice cream into 10 balls, about 3 tablespoons each. If you baked more than 20 cookies, you can scoop a few extra balls.
- Cover the ice cream balls with another sheet of parchment. Gently press each ball down so it spreads to roughly the size of your cookies. If the ice cream softens too much, slide the tray into the freezer for 5 to 10 minutes to firm it back up.
- To assemble, place one flattened ice cream round between two cooled cookies and press gently to create a sandwich. Enjoy right away for a softer texture, or wrap each sandwich tightly in plastic, foil, or parchment. Freeze for up to 3 months.
How to keep the cookies soft and chewy even after freezing
The key to soft, freezer-friendly cookies is managing moisture and bake time. First, don’t overbake. Pull the cookies when the tops look dry but the centers still feel slightly soft; they’ll finish setting as they cool. Even 1–2 extra minutes in the oven can make them too firm once frozen. Second, avoid packing in extra flour — measure by weight if you can, or use the spoon-and-level method. Finally, cool the cookies completely, then freeze the assembled sandwiches well wrapped to prevent freezer burn, which dries them out. Let them sit at room temperature for 5 minutes before eating for the best bite.
Make Ahead And Freezing Instructions:
This recipe is built for planning ahead. You can bake the chocolate cookies up to 2 days in advance and store them in an airtight container at room temperature with a small piece of parchment between layers. For longer storage, freeze the plain cookies in a well-sealed bag for up to 2 months. When you’re ready to assemble, let frozen cookies sit out for 10 minutes so they’re not rock hard. You can also assemble the full ice cream sandwiches and freeze them individually wrapped for up to 3 months. Press out as much air as possible when wrapping to keep ice crystals from forming and protect both the cookie texture and the ice cream flavor.
Your Questions Answered
Can I use different types of cocoa powder, like Dutch-process, in these cookies?
Yes, you can, but it helps to know what to expect. This recipe is written for natural unsweetened cocoa powder, which works well with the baking soda. If you swap in Dutch-process cocoa, the flavor will be a bit deeper and smoother, but the cookies may spread slightly differently. To keep structure, you can use half natural and half Dutch cocoa. Don’t increase the baking soda; too much can make the cookies taste soapy and affect the chew.
How do I keep the ice cream from melting while I’m assembling all the sandwiches?
Work in small batches and use the freezer strategically. Start by scooping and pressing the ice cream balls, then freeze them until they’re firm but still pliable. Take out only a few at a time to sandwich with the cookies, leaving the rest in the freezer. If your kitchen is warm, chill the cookies in the fridge for 10 minutes first so they don’t warm the ice cream as quickly. If the ice cream starts losing shape, stop and refreeze for 5–10 minutes before continuing.
Why do my cookies sometimes turn out flat instead of thick and chewy?
Flat cookies usually come down to butter temperature, flour measurement, or overmixing. If the butter is too soft or partially melted, the dough spreads more in the oven. Aim for butter that’s just soft enough to press a finger into, not glossy or greasy. Measure your flour accurately; too little flour makes spreading more likely. Also, once you add the dry ingredients, mix only until combined. Overmixing can warm the dough and break down structure, which leads to thinner cookies.
What’s the best way to cut these into smaller portions for kids or parties?
Instead of trying to cut a fully frozen sandwich, which can crack the cookies, portion them strategically from the start. Make smaller cookies by using a slightly rounded teaspoon of dough instead of a tablespoon, and reduce the bake time by 1–2 minutes, watching closely. Scoop smaller ice cream balls to match. If you’ve already made full-size sandwiches, let them sit at room temperature for 5–7 minutes, then use a sharp knife to gently press straight down through the center. A sawing motion can shatter the cookies, so one clean press works best.
Classic Chocolate Ice Cream Sandwich
Equipment
- Hand mixer
- Mixing bowls
- Baking sheets
- Parchment paper
- Cookie Scoop
Ingredients
- 8 tablespoons unsalted butter 115 grams, at room temperature (1 stick)
- 1/2 cup granulated sugar 100 grams
- 1/2 cup light brown sugar 100 grams
- 1 large egg
- 1 teaspoon vanilla extract
- 1/4 teaspoon salt
- 1 1/4 cups all-purpose flour 160 grams
- 6 tablespoons unsweetened cocoa powder 30 grams
- 1/2 teaspoon baking soda
- 2 cups ice cream about 3 tablespoons per scoop; choose your favorite flavor
Instructions
Make Cookies
- Preheat the oven to 350°F (175°C). Line two baking sheets with parchment paper.
- In a large bowl, beat the butter with both sugars on medium speed until the mixture is pale and fluffy, about 3 to 5 minutes. Add the egg, vanilla, and salt, then mix until evenly combined.
- Whisk the flour, cocoa powder, and baking soda together in a separate bowl until uniform.
- With the mixer set low, gradually add the dry mixture to the wet ingredients, scraping the bowl as needed. Stir only until everything is incorporated—the dough will be very thick.
- Drop rounded tablespoonfuls of dough (or use a medium scoop) onto the prepared sheets, spacing them apart. Bake 9 to 12 minutes until the cookies have puffed slightly and the tops look dry.
- Let the cookies cool on the baking sheets for 5 minutes, then transfer them to a wire rack to cool completely.
Prepare Ice Cream
- Line a baking sheet or pan with parchment paper or foil. Using about 3 tablespoons per scoop, portion the ice cream into 10 balls; if you baked more than 20 cookies, make extra scoops to match.
- Cover the scoops with another sheet of parchment and press each mound down so it spreads to the size of the cookies. If the ice cream softens, place the pan in the freezer for 5 to 10 minutes to firm up.
To Finish
- Place a flattened ice cream disk between two cooled cookies to form sandwiches. Serve right away, or individually wrap each sandwich in plastic, foil, or parchment and freeze for up to 3 months.