Share with your friends!
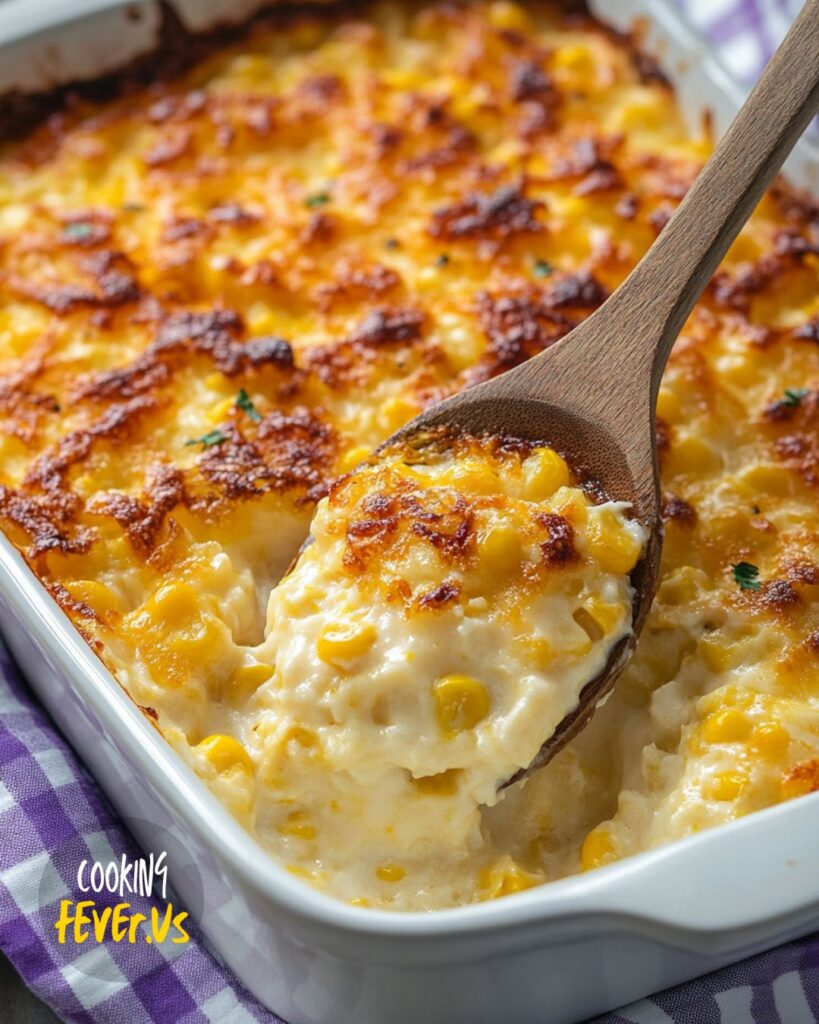
You know how it is; as a busy wife and mom, I’m always looking for recipes that are quick to prepare but still feel special. This sweet creamed corn casserole fits that bill perfectly! With just a handful of ingredients, most of which you probably have on hand, you can whip this up in no time. What’s even better is that it tastes amazing fresh out of the oven, but it also makes the best leftovers. I often make it in bulk just so my family has some for the next day when things get a bit hectic.
Whether you’re looking to jazz up a weeknight dinner, bring something delicious to a potluck, or treat your family to a warm and comforting side dish, this casserole is a winner. The creamy goodness combined with the sweet corn flavor creates a delightful harmony that pairs well with just about anything. Plus, it’s a fantastic way to sneak in some veggies that the little ones might otherwise shy away from!
If you’re ready to dive into this warm, comforting dish that’ll have your family coming back for seconds (and thirds!), let’s get started!
How to Make Sweet Creamed Corn Casserole
Click here to get printable version
Ingredients
- 1 stick of butter (1/2 cup)
- 1 (15-oz) can whole corn kernels, drained
- 1 (15-oz) can creamed corn
- 1 cup sour cream
- 3 tablespoons sugar
- 1/2 teaspoon kosher salt
- 1 (8-oz) box Jiffy corn muffin mix
Directions
First, you’ll want to preheat your oven to 350 degrees Fahrenheit. Grab a glass baking dish (an 8×8 or 9×9 inch works great) and place your stick of butter inside. Pop it in the microwave just until it’s melted, making sure to coat the sides of the dish with the butter to prevent everything from sticking.
Next, take your can of whole corn kernels and drain them by pressing down on the lid—this helps get rid of any excess liquid. Pour the drained corn into your buttered dish.
Now, it’s time for the creamed corn! Add the entire can directly to the dish without draining it. Then, mix in a cup of sour cream, followed by the sugar and kosher salt. Don’t worry if you prefer regular table salt; you can adjust the amount to your taste.
Finally, sprinkle in the Jiffy corn muffin mix and stir everything together well, ensuring that all ingredients are evenly combined. Once you have a nice, uniform mixture, it’s ready to bake!
Put the baking dish in the preheated oven and let it bake for about 35 to 40 minutes. You’ll know it’s done when the edges are golden brown and pulling away from the sides, and the center is firm to the shake test. If you’re ever in doubt, a toothpick test in the center will confirm doneness—if it comes out clean, it’s ready to enjoy!
Once it’s out of the oven, let it cool for a few moments on a wire rack before digging in. Serve it warm and watch your family love every bite!

Storing Suggestion
This sweet creamed corn casserole can be stored in an airtight container in the refrigerator for up to 3-4 days. If you want to keep it longer, you can freeze it for up to two months. Just be sure to let it cool completely before transferring to a freezer-safe container.
Cooking Tips
If you’re looking to enhance the flavors, consider adding some shredded cheese on top of the casserole before baking. Cheddar or Monterey Jack works particularly well. You can also substitute Greek yogurt for the sour cream for a healthier twist. When using a metal pan, pre-melting the butter in a bowl will help with consistency.
Serving Suggestions
This casserole is perfect on its own, but if you’re looking to round out the meal, consider serving it alongside roasted chicken or grilled steak. A fresh garden salad or some steamed vegetables would also make a delicious addition to balance the meal. Don’t forget a nice glass of iced tea or lemonade!
Ingredient Substitutions
If you’re out of sour cream, you can substitute with Greek yogurt or cottage cheese for a similar creamy texture. For the Jiffy corn muffin mix, any cornbread mix will do, just adjust your ratios according to the package instructions. You can also use dairy-free alternatives if you need to accommodate food sensitivities.
Seasonal Variations
In the fall, consider adding some roasted butternut squash or pumpkin puree for a twist that pairs perfectly with the flavors of the season. In the summer, feel free to incorporate fresh corn cut from the cob for an even sweeter flavor. You can also toss in some diced jalapeños for a spicy kick if you’re feeling adventurous!
Allergen Information
This recipe contains dairy and can be made gluten-free by opting for a gluten-free cornbread mix. If you have an egg allergy, rest assured this recipe is egg-free. Always check other packaged ingredients for allergens to ensure they meet your needs.
Frequently Asked Questions
1. Can I use frozen corn instead of canned corn?
Yes, frozen corn can be used in this recipe. Just thaw it out and drain any excess moisture before adding it to the casserole. It will give you a fresh taste, and it’s a great way to use fresh ingredients all year round!
2. How do I reheat leftovers?
To reheat the casserole, preheat your oven to 350 degrees Fahrenheit and cover the dish with foil to prevent it from drying out. Heat it for 15-20 minutes, or until warmed through. You can also microwave individual servings if you’re in a hurry.
3. Can I double this recipe for a larger crowd?
Absolutely! Just double all the ingredients and bake in a larger dish. You may need to adjust the baking time, so keep an eye on it; it might take a little longer to ensure it’s thoroughly cooked.
4. Is this casserole suitable for freezing?
Yes, it freezes beautifully! Just make sure to let it cool completely before transferring it to a freezer-safe container. It can be reheated from frozen if you have time; alternatively, you can let it thaw in the fridge overnight before reheating.
5. What can I serve this casserole with?
This dish pairs wonderfully with grilled meats, salads, or just by itself as a hearty side. For a more filling meal, try serving it with barbecued ribs or fried chicken. It’s versatile and complements many different flavors!
6. How do I know when the casserole is done baking?
The casserole is done when the edges start to turn golden brown and pull away from the sides, and the center is firm. A toothpick inserted into the middle should come out clean. If you notice the top browning too quickly, you can cover it with foil during the last few minutes of baking.

Sweet Creamed Corn Casserole
Ingredients
- 1/2 cup butter 1 stick
- 1 15-oz can whole corn kernels drained
- 1 15-oz can creamed corn not drained
- 1 cup sour cream
- 3 tablespoons sugar
- 1/2 teaspoon kosher salt reduce to 1/4 teaspoon if using table salt
- 1 8-oz box Jiffy corn muffin mix
Instructions
- Preheat the oven to 350 degrees F.
- In an 8x8 or 9x9 inch glass baking dish, melt the butter in the microwave, coating the sides to prevent sticking.
- Drain the whole corn kernels and add to the buttered pan.
- Pour the creamed corn into the pan.
- Mix in the sour cream, sugar, and kosher salt.
- Stir in the Jiffy corn muffin mix until combined.
- Bake for approximately 35-40 minutes, until the edges are golden and the center is firm.
- Allow to cool on a wire rack before serving warm.