Share with your friends!
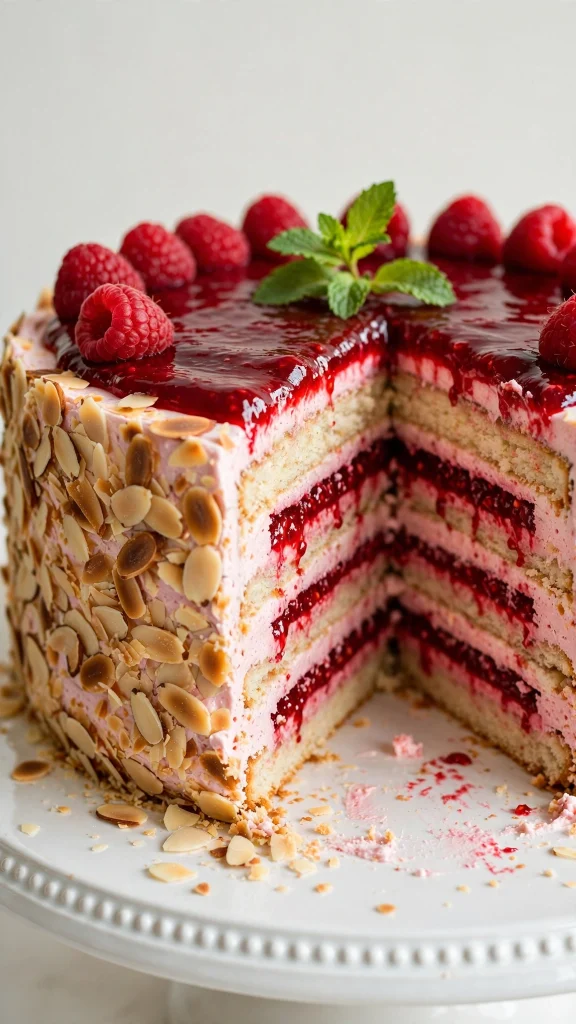
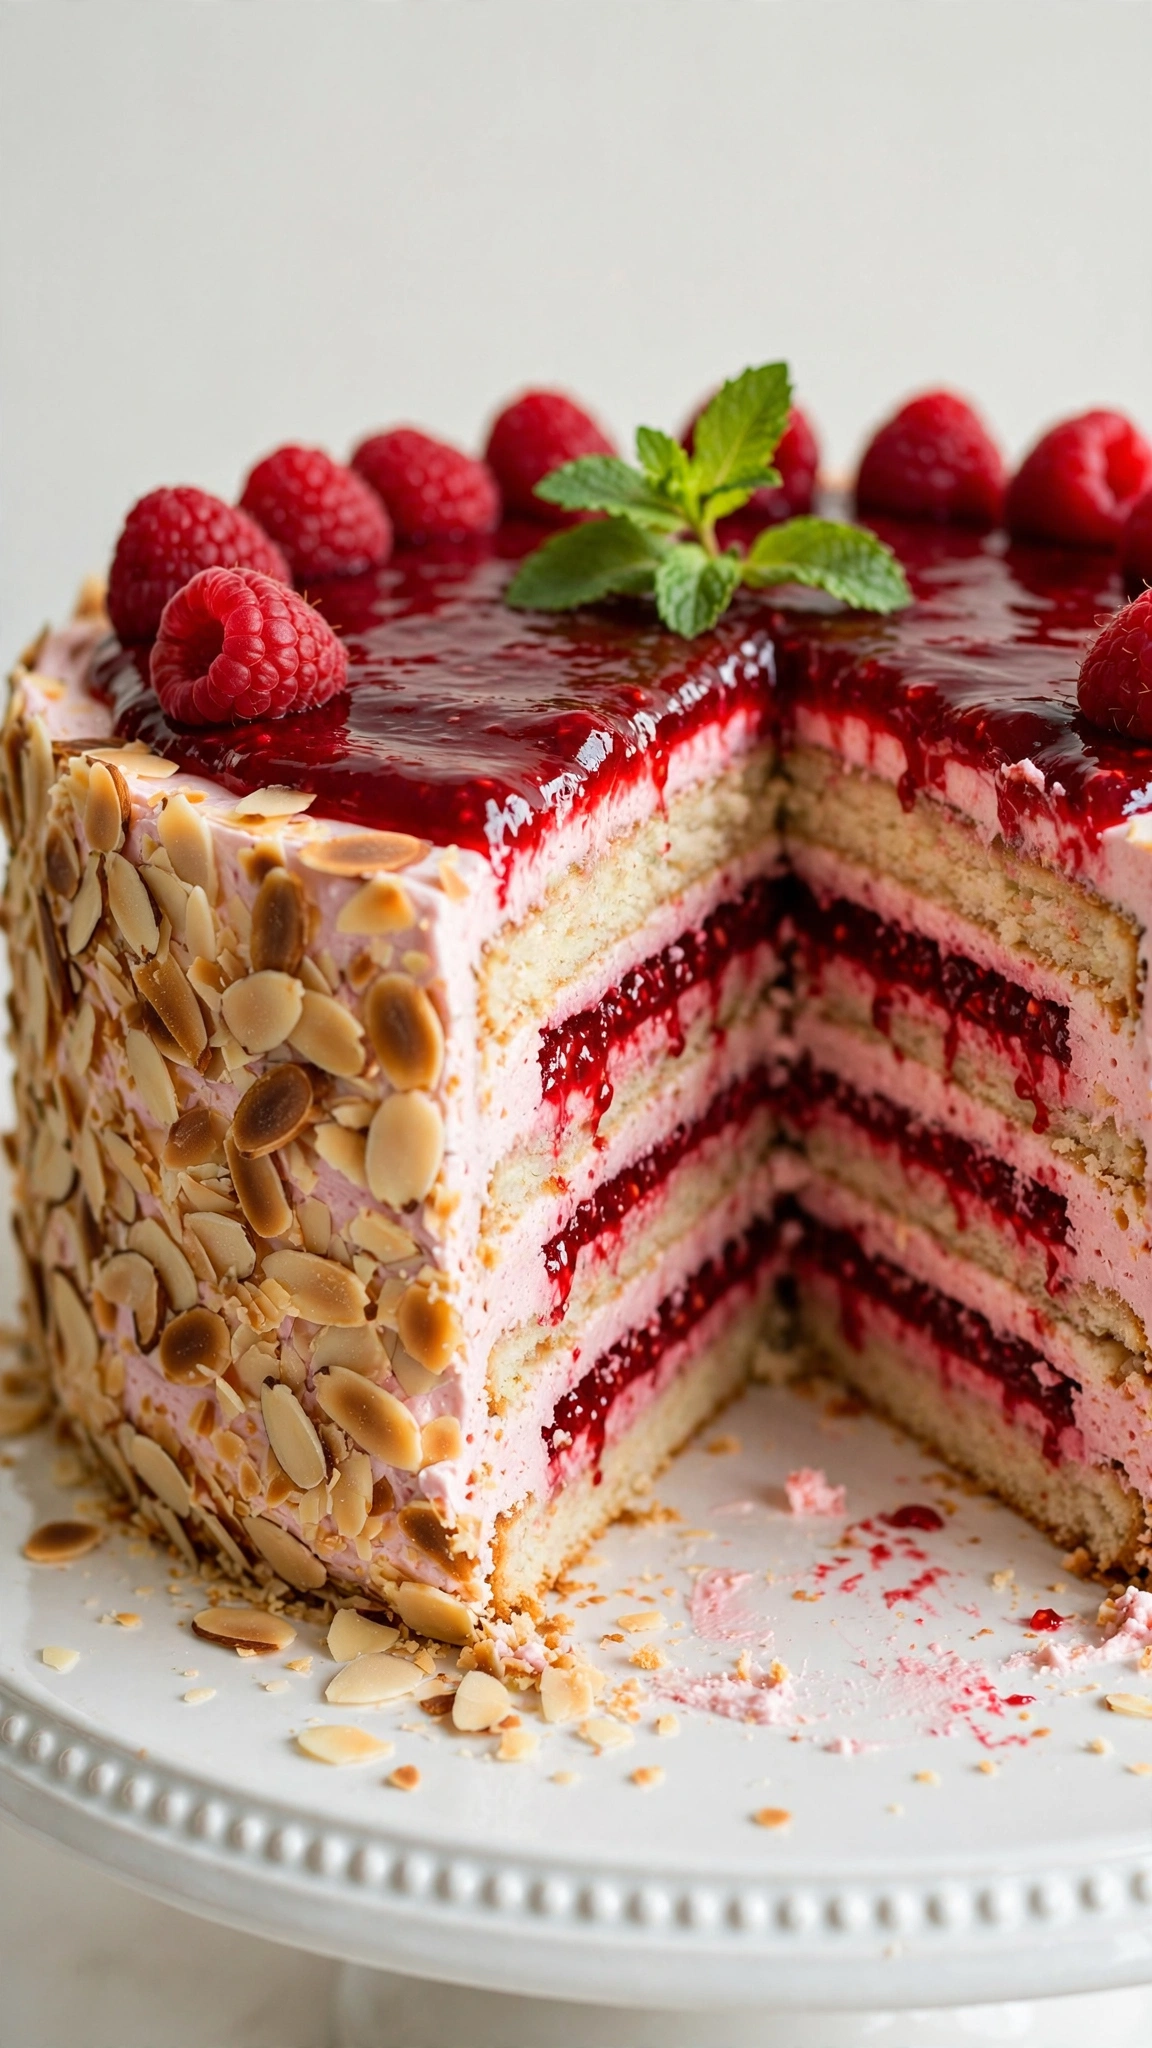
When people ask me why their layer cakes sometimes slide around or collapse, it almost always comes back to one thing: the structure in the filling and cream. This Strawberry & Raspberry Layer Cake is a good example of how a few simple techniques can completely change your results. You’re not just stacking cake here; you’re building clean, stable layers that slice neatly and hold their shape in the fridge.
The key moves in this recipe are thickening the berry filling to the right consistency, keeping the sponge layers light but sturdy, and whipping a mascarpone cream that won’t slump. None of these steps are complicated, but each one has a “sweet spot” you want to hit. Once you understand what to look for in the pot and in the mixing bowl, you can repeat your success every time.
I first made this cake while testing ways to get strong berry flavor without an over-the-top sweetness. Cooking part of the strawberries and raspberries into a thick custard and then folding in fresh fruit at the end turned out to be the answer. You get bright flavor, a pleasant tang from the berries and lemon, and a filling that doesn’t gush out when you cut into it. If you’ve had trouble with runny fruit layers or heavy cream toppings in the past, this cake is a solid way to practice getting those details right.
Strawberry & Raspberry Layer Cake, Made Easy
Click here to get printable version
Fresh Finds for Your Recipe
- Strawberry & raspberry filling
- 1 cup (240 ml) water, divided
- 2.1 oz (60 g) cornstarch*
- 17.6 oz (500 g) fresh strawberries, diced
- 3.5 oz (100 g) fresh raspberries
- 3/4 cup (150 g) fine sugar*
- 2 tbsp lemon juice
- 1 tsp vanilla extract*
- Cake batter
- 8 medium eggs, separated
- 1 pinch salt
- 1 cup (200 g) fine sugar*, divided
- 1 tsp vanilla extract*
- 8.1 oz (230 g) all-purpose flour*
- 1/2 tsp baking powder
- 1/4 tsp salt
- Mascarpone cream
- 9 oz (250 g) mascarpone, cold
- 2 tbsp confectioners’ sugar*
- 2 tsp vanilla extract*
- 9 oz (250 g) heavy cream or alternative* (cold; see note in original recipe)
- Decoration
- 5.3 oz (150 g) sliced almonds, toasted
- Fresh strawberries and raspberries, for topping (optional)
Prep & Assemble
- Cook the berry base
Add half of the water to a small bowl and whisk in the cornstarch until smooth. Set aside. Rinse and dry the strawberries and raspberries. Hull the strawberries and cut them into small dice. Add half of the diced strawberries and all the raspberries to a large saucepan along with the remaining water, sugar, lemon juice, and vanilla. - Blend and thicken the filling
Use an immersion blender to puree the mixture until smooth. Heat over medium-high until it comes to a boil, then reduce to a gentle simmer and cook for 2–3 minutes, stirring often. Whisk the cornstarch mixture again, then pour it into the pan while stirring. Cook, stirring constantly, until the mixture thickens and looks like a glossy, very thick berry custard, about 2 more minutes. - Finish and cool the filling
Remove from the heat and let cool for a few minutes, then fold in the remaining fresh diced strawberries. Press plastic wrap directly onto the surface to prevent a skin forming. Let cool completely at room temperature, then chill. You can make this up to 1 day ahead. - Prepare pans and oven
Preheat the oven to 170°C (340°F). Lightly grease four 20 cm (8-inch) round silicone baking molds or cake pans. If using metal pans, it’s helpful to line the bases with parchment for easier release. - Whip the egg whites
Place the egg whites and a pinch of salt into the bowl of a stand mixer (or a large mixing bowl). Whisk on medium speed until slightly foamy. Gradually sprinkle in half of the sugar (100 g), then increase to high speed and whip until the meringue is thick, glossy, and holds medium-firm peaks. Don’t overbeat to dry, clumpy peaks. - Beat yolks and combine dry ingredients
In a separate bowl, beat the egg yolks with the remaining 100 g sugar and the vanilla until the mixture is pale and airy, 2–3 minutes. In another bowl, whisk together the flour, baking powder, and 1/4 tsp salt. Sift the dry mixture over the yolk mixture in 2–3 additions, gently folding with a spatula until just combined. The batter will feel thick at this stage. - Fold in the meringue
Add about one-third of the whipped egg whites to the thick yolk batter and fold in a bit more vigorously to loosen. Then fold in the remaining egg whites in 2–3 additions using a gentle motion, turning the bowl as you go. Stop folding as soon as no obvious streaks remain. The batter should look light and airy, not runny. - Bake the sponge layers
Divide the batter evenly between the four prepared molds and smooth the tops. Bake for 20–23 minutes, rotating the pans halfway through baking for even browning. The layers are done when they’re lightly golden, spring back when gently pressed, and a toothpick comes out clean. - Cool the cakes
Remove from the oven and let sit for a few minutes, then invert the molds onto wire racks. Carefully peel off the silicone once the cakes have released and are cool enough to handle. Let the layers cool completely before filling. Slightly warm or hot cake will melt the mascarpone cream. - Make the mascarpone cream
In a large bowl, mix the cold mascarpone, confectioners’ sugar, and vanilla until smooth and combined. Pour in the cold heavy cream. Start mixing on low speed so it doesn’t splash, then gradually increase to medium-high. Whip until the cream forms stiff peaks that hold their shape, about 2–3 minutes. Don’t overmix or it can turn grainy. Transfer to a large piping bag fitted with a star tip. - Layer the cake
Place one sponge layer on a serving plate. Pipe some mascarpone cream on top, then spread it into an even layer with an offset spatula. Pipe a ring of cream around the edge of the cake layer to create a border. Spoon a generous amount of the chilled strawberry-raspberry filling into the center and spread it evenly up to the cream border. - Build the remaining layers
Set the second cake layer on top and press down gently to secure. Repeat the process with cream, a piped border, and berry filling for the remaining layers. Finish with the last cake layer on top. Use the remaining mascarpone cream to coat the top and sides of the cake. This doesn’t need to be perfectly smooth; aim for an even coverage. - Add almonds and decorate
Hold the cake over a tray or large plate and gently press the toasted sliced almonds onto the sides, letting any excess fall back into the tray. Use the last bit of mascarpone cream to pipe swirls or rosettes on top. Garnish with fresh strawberries and raspberries if you like. - Chill and serve
Refrigerate the assembled cake for several hours, or until the filling and cream are fully set and the flavors have melded. For the neatest slices, use a sharp knife and wipe it clean between cuts. Keep leftovers covered in the fridge.
Thickening the Berry Filling
The filling is what keeps this Strawberry & Raspberry Layer Cake from feeling overly sweet or heavy, but it has to be thick enough to stay put. The cornstarch needs to be fully cooked to activate its thickening power. After adding the slurry, keep the mixture at a gentle bubble for about 2 minutes, stirring constantly. The texture should go from loose and shiny to a noticeably thick, pudding-like consistency. If it still runs quickly off the spoon, keep cooking in 30-second bursts. Also, let the filling cool completely before using. If it’s even slightly warm, it will soften the cream layer and can cause sliding between the tiers.
Keeping Sponge Layers Light
This cake relies on whipped eggs rather than lots of fat, so how you fold and bake the batter is crucial. When combining the yolk mixture, flour, and meringue, always treat the whipped egg whites as something you want to deflate as little as possible. Use a wide spatula, cut down through the center, and turn the bowl, lifting the batter from the bottom. Stop as soon as the streaks disappear. Overfolding gives you a dense sponge that doesn’t soak up the filling well. During baking, avoid opening the oven door in the first 15 minutes, or the layers can sink. Cooling them on a rack and not in the pan also helps keep the texture light and even.
Stabilizing Mascarpone Cream
Mascarpone cream is easier to overwhip than plain whipped cream because it starts out thicker. Keep both the mascarpone and heavy cream well chilled, and mix the mascarpone with sugar and vanilla before adding the cream. Once the cream goes in, start on low speed and increase gradually. Watch the mixture closely: you want firm peaks that stand up when you lift the whisk, but the surface should still look smooth and slightly glossy. If you see graininess or the cream starts to look a bit curdled, you’ve gone too far. In that case, gently fold in a tablespoon or two of cold cream by hand to loosen it slightly. Properly whipped mascarpone cream will pipe cleanly and hold decorative swirls for hours in the fridge.
Frequently Asked Questions (FAQ)
Can I bake this cake in fewer, taller layers instead of four thinner ones?
You can, but you’ll need to adjust both baking time and handling. Baking in two deeper 20 cm pans means the centers will take longer to cook, usually 30–35 minutes. Check that the middle springs back and a skewer comes out clean. Once cooled, you’ll also need to slice each thick layer in half horizontally, which requires a long, sharp serrated knife and a steady hand. Thicker layers are more prone to doming and can be less stable with a soft filling, so make sure the berry filling is very thick and that the cake is well chilled before slicing.
What’s the best way to toast sliced almonds evenly without burning them?
For consistent results, use the oven rather than a skillet. Spread the sliced almonds in a single layer on a baking sheet and toast at about 160–170°C (320–340°F) for 6–10 minutes, stirring once or twice. Stay nearby and check often in the last few minutes, as they go from pale to burnt quickly. You’re looking for light golden edges and a nutty aroma, not dark brown color. Let them cool completely before pressing onto the cake so they stay crisp and don’t melt into the cream.
How far in advance can I assemble the cake without the texture suffering?
For the best texture, fully assemble the cake 4–24 hours before serving. This window allows the flavors to blend while the sponge absorbs a bit of moisture from the filling and cream without becoming soggy. If you need more lead time, bake the sponge layers and cook the berry filling up to 2 days ahead, keeping them well wrapped and refrigerated. Whip the mascarpone cream and assemble the cake no more than a day in advance. Always store the finished cake covered in the fridge, and avoid freezing once assembled, as the mascarpone cream can turn grainy after thawing.
Strawberry & Raspberry Layer Cake
Equipment
- saucepan
- Immersion blender
- Electric mixer
- Four 20 cm round silicone baking molds
- Wire rack
- Piping bag with star tip
- Rubber spatula
Ingredients
Strawberry & Raspberry Filling:
- 1 cup (240ml) water
- 2.1 oz. (60g) cornstarch
- 17.6 oz. (500g) fresh strawberries diced
- 3.5 oz. (100g) fresh raspberries
- 3/4 cup (150g) sugar (fine)
- 2 tablespoons lemon juice
- 1 teaspoon vanilla extract
Cake Batter:
- 8 medium eggs divided
- 1 pinch salt for egg whites
- 1 cup (200g) sugar (fine) divided
- 1 teaspoon vanilla extract
- 8.1 oz. (230g) all-purpose flour
- 1/2 teaspoon baking powder
- 1/4 teaspoon salt
Mascarpone Cream:
- 9 oz. (250g) mascarpone cold
- 2 tablespoons confectioners' sugar
- 2 teaspoons vanilla extract
- 9 oz. (250g) heavy cream cold (or alternative)
Decoration:
- 5.3 oz. (150g) sliced almonds toasted
- fresh strawberries and raspberries for decorating, optional
Instructions
- Gather all ingredients and equipment before starting.
For the strawberry & raspberry filling:
- Whisk the cornstarch into about half of the water until smooth and set aside.
- Place half of the diced strawberries and all the raspberries into a large saucepan with the remaining water, sugar, lemon juice, and vanilla. Purée the mixture with an immersion blender until smooth.
- Bring the puréed berries to a boil over medium heat, then reduce to a simmer for 2–3 minutes.
- Stir the cornstarch slurry into the simmering berries and continue cooking, stirring, until the mixture thickens; let it bubble for about 2 more minutes to reach a custard-like consistency.
- Remove from the heat, let cool briefly, then fold in the remaining diced strawberries. Press plastic wrap directly onto the surface to prevent a skin and chill until completely cold. (This can be prepared a day ahead.)
For the cake layers:
- Preheat the oven to 170°C (340°F). Lightly grease four 20 cm round silicone baking molds and set them aside.
- Separate the eggs. Put the egg whites and a pinch of salt into the bowl of a mixer and whip until they become foamy.
- With the mixer running, add half of the sugar (about 100 g) gradually and continue beating on high until the whites are thick, glossy, and hold volume (around 2 minutes after the sugar is incorporated).
- In a separate bowl, beat the egg yolks with the remaining sugar (about 100 g) and vanilla until pale and slightly fluffy, about 2–3 minutes.
- Sift together the flour, baking powder, and the 1/4 teaspoon salt. Add the dry ingredients to the yolk mixture in batches, folding with a rubber spatula.
- Fold the whipped egg whites into the batter in several additions. Start by loosening the batter with a gentle but slightly more vigorous fold, then finish with careful folds to retain volume.
- Divide the batter evenly between the prepared molds and bake for 20–23 minutes, rotating the molds halfway through baking. When done, invert the molds onto wire racks and remove the silicone once cooled slightly.
For the mascarpone cream:
- Combine cold mascarpone, confectioners' sugar, and vanilla in a large bowl and beat until smooth and homogenous.
- Add the cold heavy cream and begin whisking slowly, then increase speed and whip until the mixture forms firm peaks, about 2–3 minutes.
- Transfer the cream to a piping bag fitted with a star tip and set aside until assembly.
Assembly and decoration:
- Place one cake layer on a serving plate. Pipe a small amount of mascarpone cream onto the layer and spread it gently to an even thickness using an angled spatula.
- Pipe a cream border around the edge to create a dam, then spoon a generous layer of the chilled strawberry-raspberry filling into the center and smooth it out.
- Top with the next cake layer, press gently, and repeat the cream and filling layers until all layers are stacked.
- Coat the entire cake with the remaining mascarpone cream. Hold the cake over a plate or bowl and press the toasted sliced almonds onto the sides so they adhere.
- Use remaining piped cream to make decorative swirls on top and arrange fresh strawberries and raspberries if desired. Chill the assembled cake in the refrigerator until ready to serve.